Home
On My Workbench
Pictures 1
Pictures 2
Pictures 3
Night Shots
Aerial Photographs
Description
Loco Fleet
Wagons
Visitors Stock
Other Stock
DCC
Exhibitions
Magazine Articles
Making Transfers
Loftus Road
Items For Sale
Links
Email
Copyright © 2005-2010
James Makin
| |
Wells Green TMD | |
|
Making Transfers
Many people have asked questions about how I do this, and it is an area that is ignored by nearly all the modelling magazines, so I thought I'd show the 'warts and all' processes involved in making my own transfers, and all the things that can go wrong - this is certainly not just a page of advertising! Firstly, I should point out that making transfers is expensive, and you rarely get anything to go perfectly the first time! Wherever possible though, you should try to use professional transfers from the likes of Fox and Modelmaster, because the depth of colour and image clarity is often second to none.
NOTE - As of October 2006, a number of viewers have got in touch to say that the range of Supercal Decal Papers are no longer available - although there are a large number of other similar products out there. I use the Supercal Decal System to make my transfers - there are other systems available, this is just the one with which I have most experience. I bought the very expensive starter pack (£19.99) mail order from Galaxy Models of Ipswich. You don't get much - five sheets of A5 paper (choose either clear or white, more about that later) and an aerosol can of "last step decal spray" worth £9.99. Some considerations The decal spray is nothing more than varnish, and I found that I produced just as good results using a Railmatch Aerosol Matt Varnish no. 1407, for half the price. Incidentally, I use the same Railmatch varnish for all my models, so there is a cost saving in that you can use the varnish for more than just transfers! To start with you have to decide what you are making a transfer of, and where you will end up laying your decal. If it is a dark surface, it is most likely that you will need to use white-backed paper to get a good result. If however, you are laying the decal on a light surface, you can consider using either clear-backed or white-backed paper. Do you have any white in your image? If so, you will need white paper, as computers cannot print white. That is the major downfall of the home-made transfer system. Images One of the main ingredients for transfers is the image itself. This is relatively simple, as either digital photos can be used (though you might need to redraw/enhance the image using programs such as Adobe Photoshop), or you could create your own images from scratch (I use CorelDraw for this) for making transfers such as wagon data panels. When you have finished your image, print it onto plain paper to check the sizing is correct. This is probably the most time consuming part of the process. Printing When you are happy with your image, set the printer to its highest quality settings and print onto the transfer paper. An inkjet printer is recommended by Supercal, but I have had many problems using one of these to print onto their decal paper. The sheets have a very glossy finish, and I have found that the ink does not soak into the paper. Even if you leave the images to dry for several days after printing, the ink still doesn't dry properly. The fact that the ink doesn't soak in means that during printing, too much ink comes into contact with the paper at once, and 'floods' on thus ruining your delicate artwork that you've just spent hours creating. Instead, a laser printer has been found to give much better results, with a virtually water proof high quality finish. Finishing Allow a small period of time for the ink to dry (if using a laser printer) before applying the protecting varnish over the top of the decals. Leave this for a day or so to let the varnish dry out, and then the transfers can be applied just as ordinary waterslide decals from the likes of Fox Transfers or Modelmasters. Practical uses Homemade transfers can be used for all sorts of things, including making your own shop signs, road vehicle decals or just about anything else. But they work best at exhibitions on those 'one-off' models, for example a new locomotive livery or whatever. You can get yourself extra 'kudos' or 'brownie points' by having up to date or unusual models causing visitors to go 'Ooh' and 'Ahh' over your latest creation!
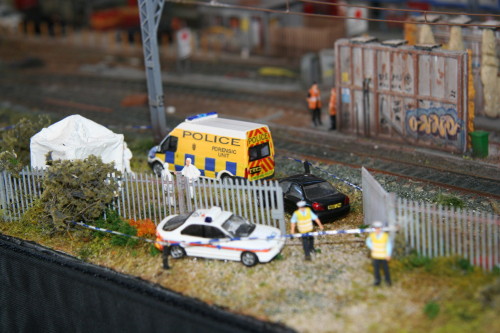
My Police forensics scene involved the creation of various Police liveries, the most comprehensive one being on the Ford Transit van. Originally it was a plain brown van, but was repainted and with the aid of home-produced transfers, I made an unusual vehicle, which together with the blue flashing lights, draws a lot of attention at exhibitions!
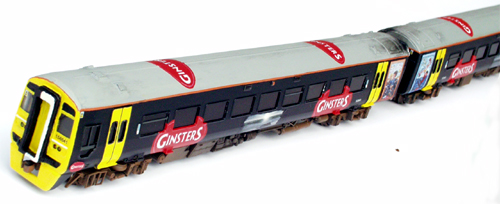
This class 158 in 'Ginsters' advertising livery is probably the model with the most amount of homemade transfers on it (I've yet to complete my Wessex '150/2'), requiring both types of paper to be used. Clear decal paper was used for the 'beach scene' image in the centre of the vehicles (laid onto a white painted base). White decal paper was used for the 'Ginsters' logos. Epson Matt Heavyweight paper (not transfer paper) had to be used for the poster images at the centre of the unit, due to problems with my Inkjet printer not functioning well with Supercal paper.
|
||